 |
 |

Front 60k Mile Service, Page Two
60k Parts List Page One Page
Two Page
Three
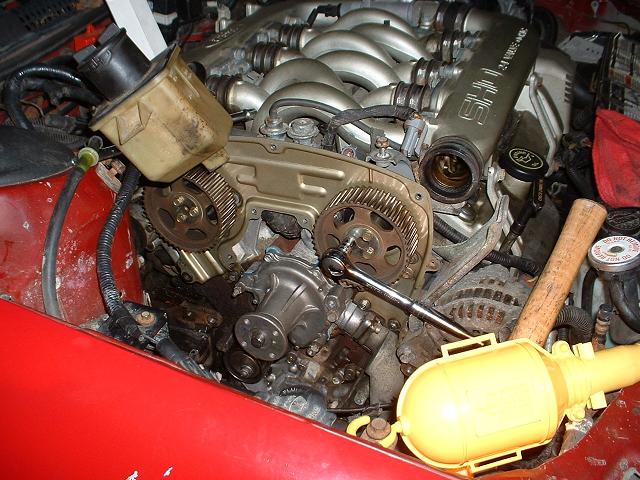
12. Now we can really get into things. Let's remove the upper timing belt cover.
There are 9 8mm bolts in a symmetrical pattern. The ninth one is just out of view where the arrow is pointing.
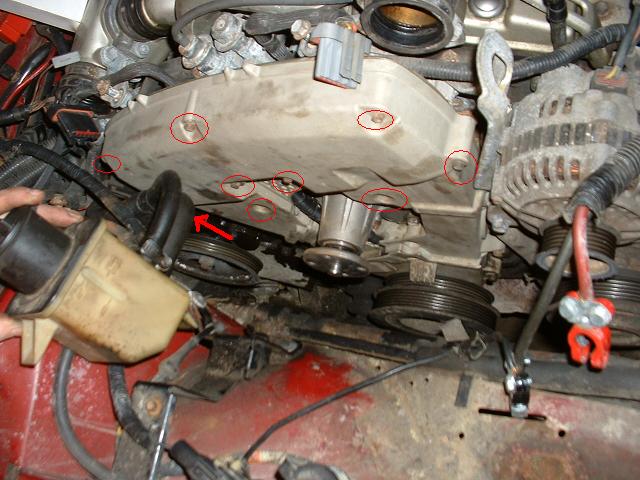
Now we can pull off the cover and our first look at the timing belt! Looks good! (It's brand new)
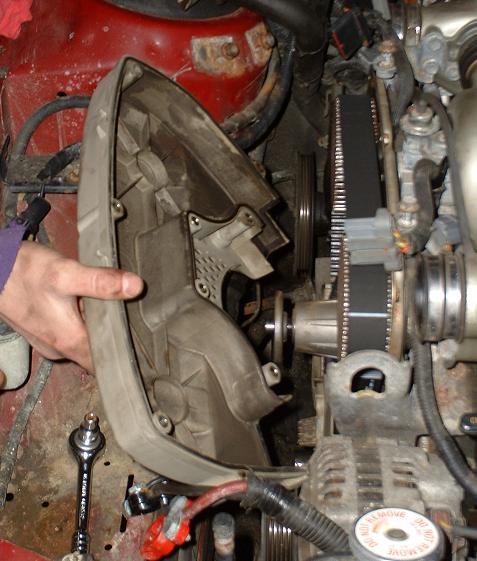
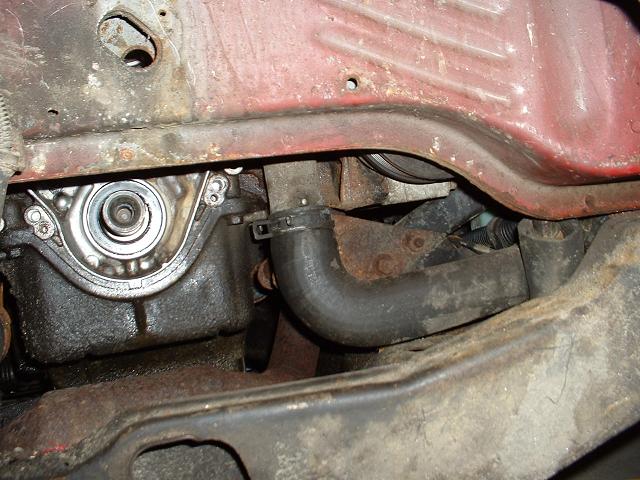
13. Remove the lower timing belt cover. There are 4 8mm bolts, but are they not the same length! Please keep track of what goes where!
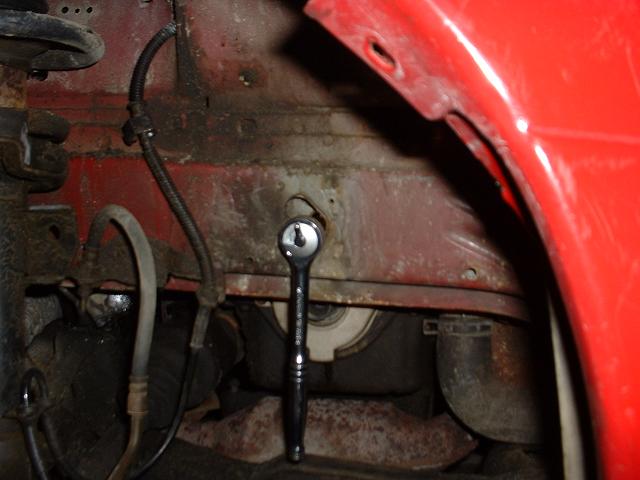
Where's that fourth bolt??? It's hidden out of view just above the timing marks on the lower cover, and can be accessed through this hole in the wheelwell.
Removing the lower timing belt cover
Here is it removed, notice the length of the two top bolts
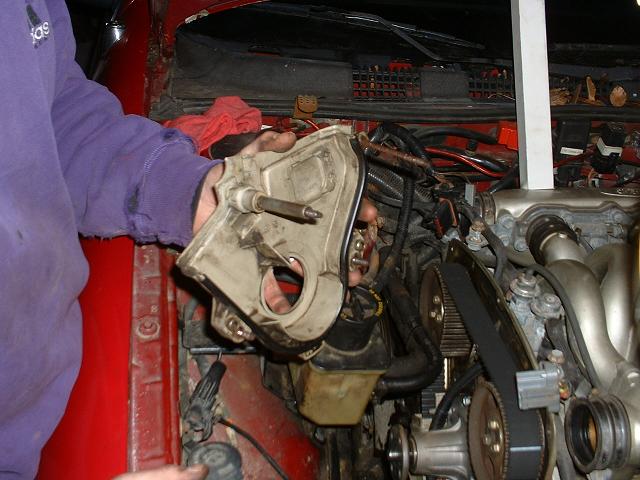
14. Remove the middle timing belt cover
First we have to unplug the CPS from the main harness. There are two plugs.
Then carefully pull the CPS wiring down through behind the rear timing belt covers. This can be frustrating, so take your time!
Then unscrew the two phillips screws holding the CPS itself. On some cars, these are 5.5mm hex screws, rather than phillips.
If the CPS won't come out, it's stuck on one of the metal vanes from the timing belt pulley. You'll have to reinstall the crank bolt to turn the crank until the CPS is free or put the crank damper back on a little bit and grasp it firmly with both hands (make sure the car is in neutral or else this won't be easy. Alternately, you can disconnect the CPS from the middle timing belt cover (next step) and then remove it later after you take off the timing belt sprocket. Ignore the arrows in this pic for this step.
The CPS wiring is connected by a rubber grommet to the middle timing belt cover here. Save yourself a headache and remove the cover and CPS together. There are only two 8mm bolts holding the middle timing belt cover on. Once it is out, separate the CPS harness from the cover.
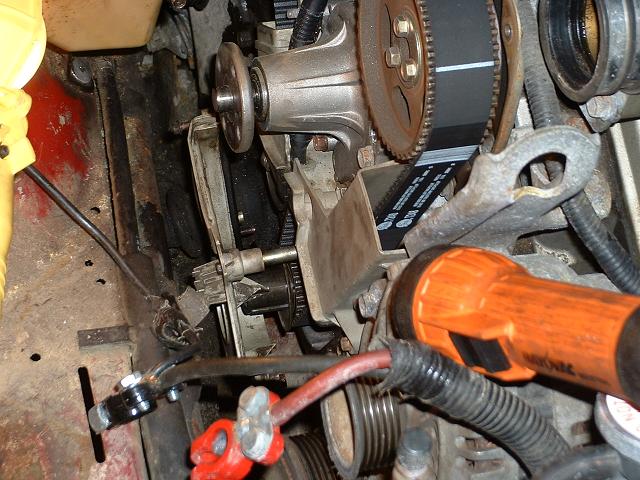
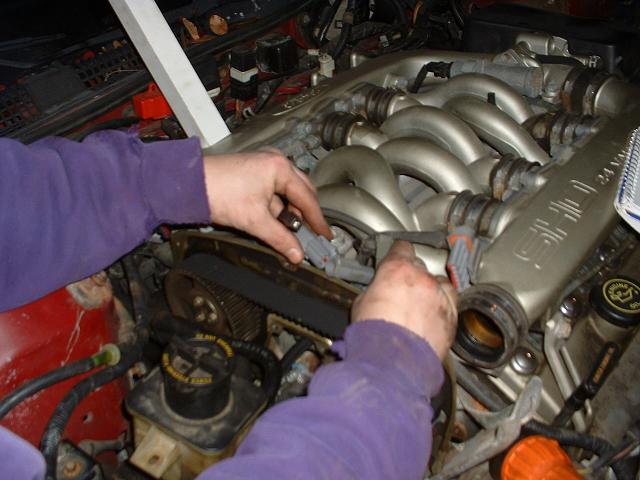
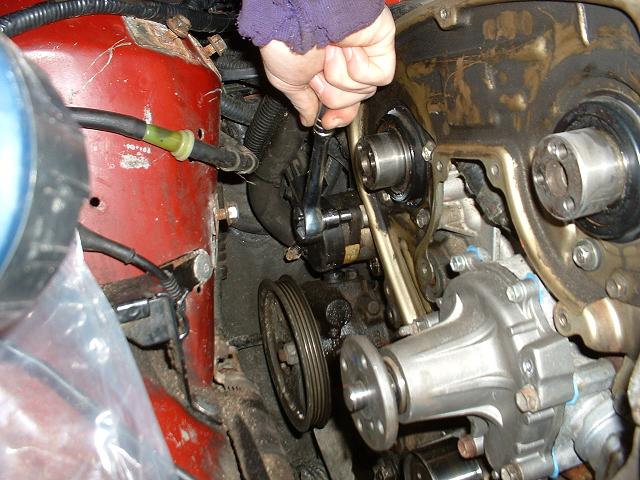
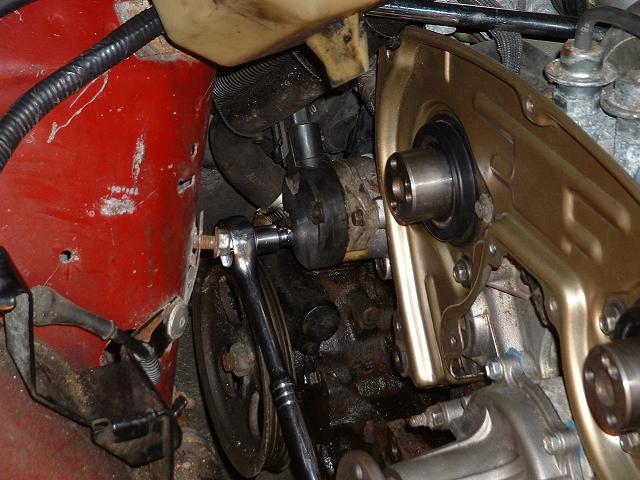
15. Before we go any further, let's break
loose
the timing belt sprocket bolts. There are three 10mm bolts
holding them on, clearly seen in this pic. NOTE: This is only
neccessary if you are changing the cam seals.
Now would be a good time to line up the timing marks. You can do
this later, but at least getting it close while the timing belt
is on will make things a little easier later. To get that crank
bolt off again, have a buddy stand on the brakes with the car in
5th gear.
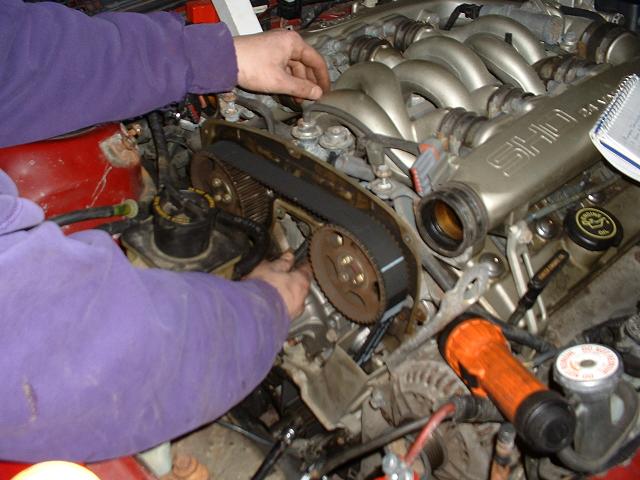
Using a socket to turn the crank bolt (clockwise) or again putting the crank damper on a little bit and turning it with both hands, line up this dot on both of the timing sprockets with this line on the rear timing belt cover.

Then check and make sure that the dot on the timing belt pulley lines up with this line. The dot is not visible in the pic, but it looks like the one above. If this doesn't line up, then rotate the crank all the way around again. This time all three should line up correctly.
16. Let's remove the timing belt now. The
steps are different for the ATX, they will be shown in detail after the
steps for the MTX.
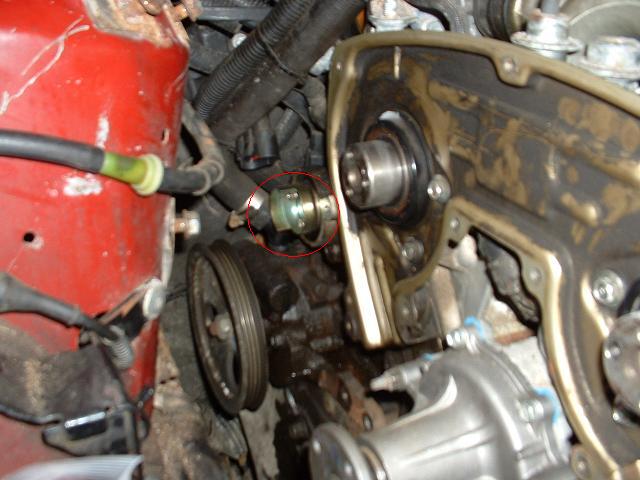
First we have to loosen the belt
tensioner.
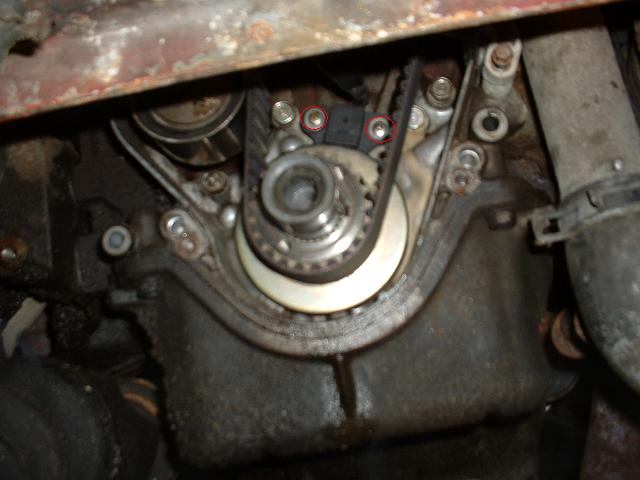
Loosen the 14mm bolt here (MTX)
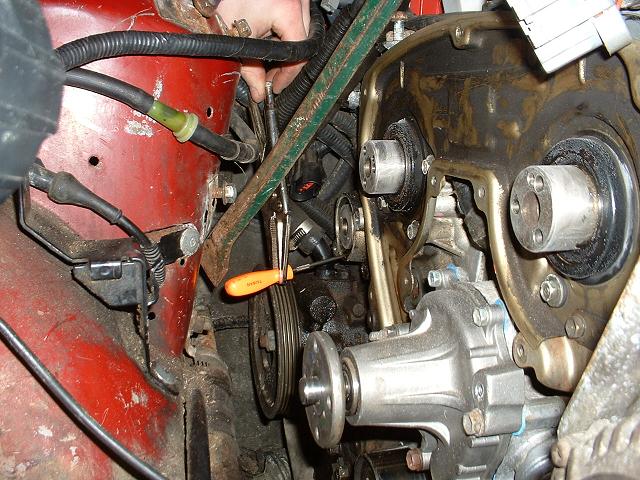
Then using a 8mm hex key, turn the
tensioner
back (turn hex key clockwise). Tighten the tensioner bolt. You'll
have to repeat this at least one more time to get the tensioner
loose enough. Once it is loosened enough, tighten the tensioner
bolt to hold it in place. (MTX)
Thanks to Jeremy Hohn for the pictures
and info on removing the timing belt on an ATX:
Use a large C-clamp to compress the
hydraulic timing belt tensioner as shown here. (ATX)
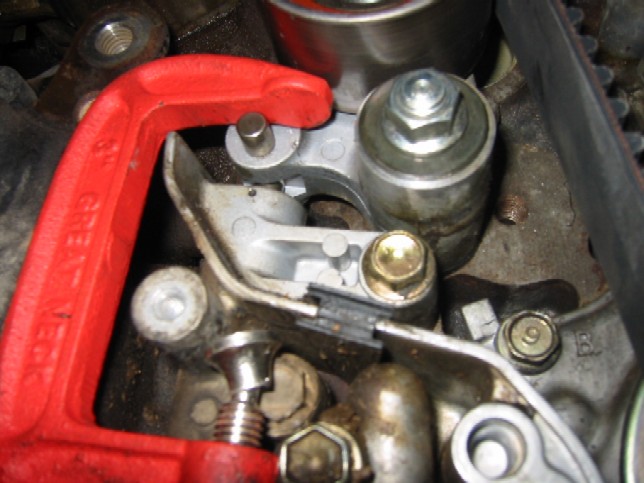
Compress the tensioner all the way until
you can push a 3mm Allen wrench into this hole and through the hole in
the tensioner shaft (ATX)
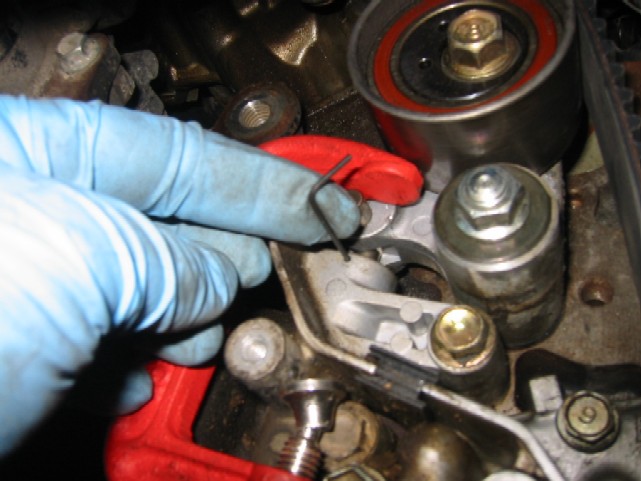
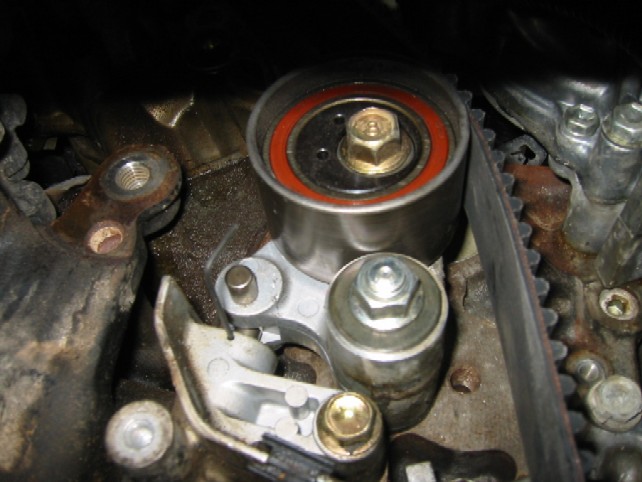
Now you will be able to remove the
C-clamp and the Allen wrench will hold the tensioner in place. The
Allen wrench should go all the way into the hole and though the
tensioner shaft. (ATX)
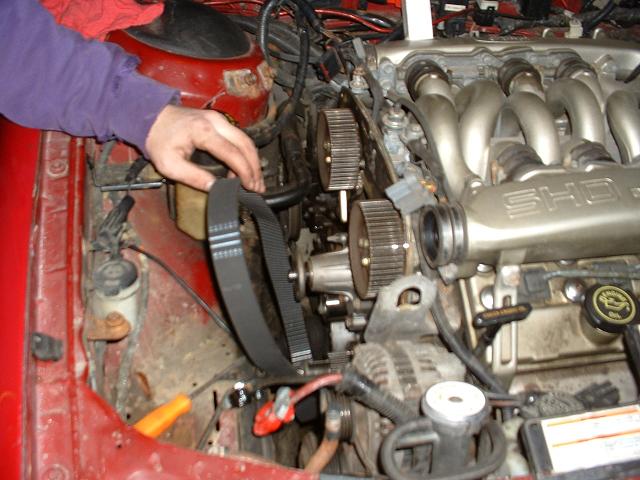
Now remove the timing belt. I've found
that the
easiest way to do this is to move it off the cam sprockets about
1/4 of an inch, then the timing belt pulley, then repeat until
it's off.
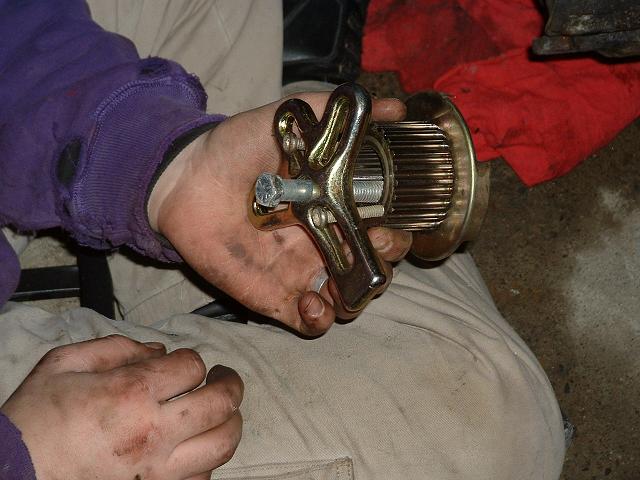
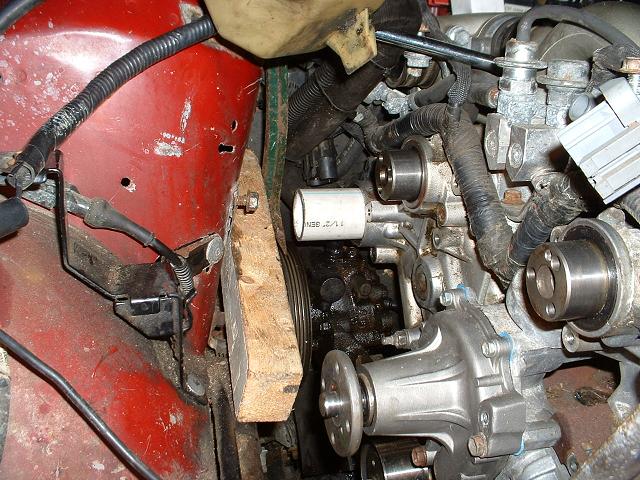
17. Remove the timing belt pulley. If you haven't removed the crank bolt yet, do it now. You'll need to put the car in 5th gear and have an assistant stand on the brakes to prevent the engine from spinning. Alternately, use a strap wrench (especially for the ATX)
Sometimes this will slide right off, but
more
than likely you'll have to use a steering wheel or engine damper
puller. The bolt to pull the timing belt pulley is M6x80mm, these
bolts can be sourced from the two longest bolts that hold on the
lower timing belt cover. Here is a pic of the timing belt pulley
removed
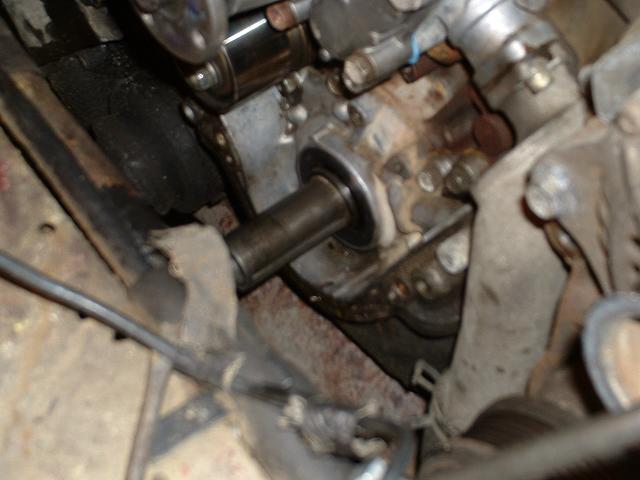
And now we can get a good look at the
crankshaft and keyway itself, also if you did not remove the CPS
in step 14, do it now.
18. We will now change the cam seals.
While
this in not always needed, once you get to this point you may as
well do it. However, be forewarned, changing the cam seals is a
serious pain in the butt. Be prepared to spend a lot of time with
this. If you want to skip the cam seals, go to step 23.
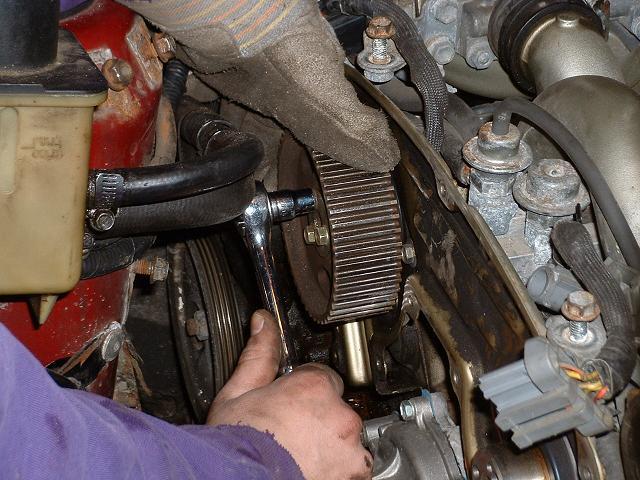
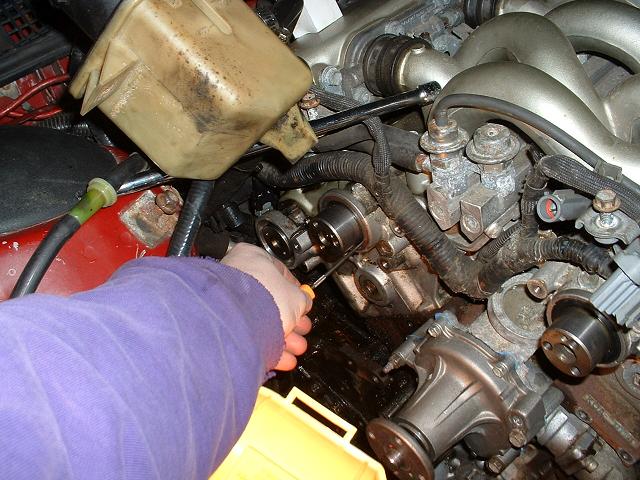
First, we will remove the cam sprockets.
There
are three 10mm bolts holding them on. If you didn't loosen them
in step 15, you can loosen them quite easily by holding them with
a gloved hand and turning against the cam's compression, as shown
here. Alternately, you can use a strap wrench.
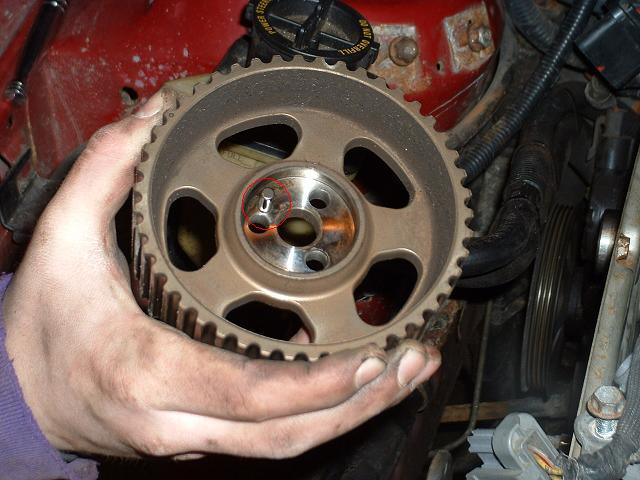
Make sure you don't lose this little pin!
This
is what you use to make sure you have the sprocket on correctly
when you reinstall it.
19. We now will remove one of the old cam
seals. Use a punch to put a hole in the cam seal. Be very
careful that you do not scratch the camshaft itself, or it will
leak forever!!! Note: In this pic the rear timing cover
has already been removed, just wanted to point that out to avoid
any confusion. We will remove the rear timing cover in step 21.
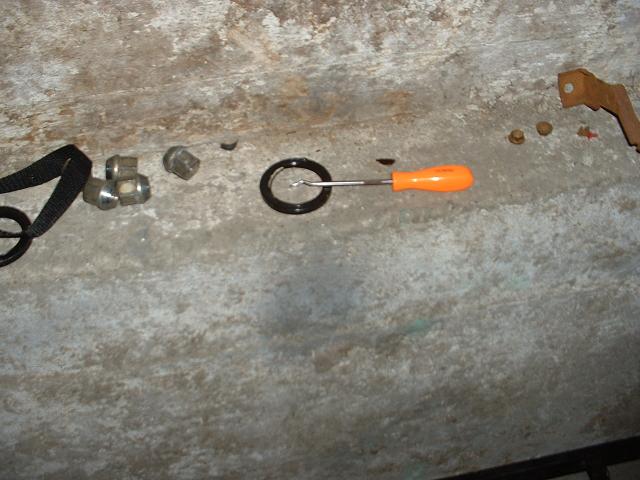
Insert a pick tool like this one into the
hole
you just made and pull the seal out.
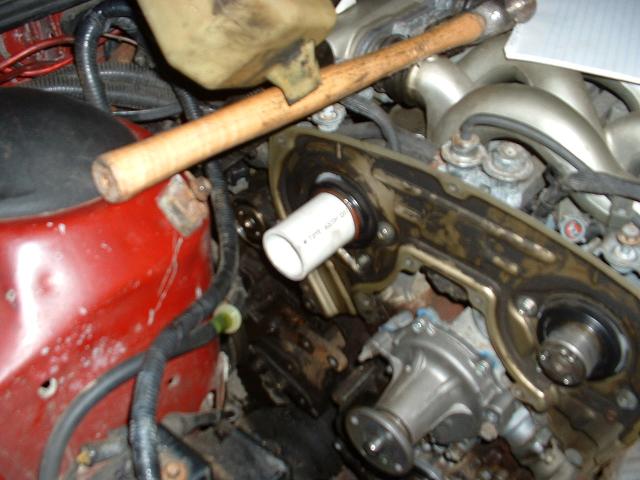
Make sure that the area where the seal
was is
nice and clean. Now put some grease on the new seal to help it
slide in. Then slide the cam seal over the camshaft. Now using a
piece 1-1/2" PVC pipe, you can press the cam seal in, as
shown here. 1-1/2" PVC fits perfectly over the camshaft, and
is just the right size to press the seal in! However, it seems
that this depends on the brand of pipe you end up getting. Two
other items that will work to press the seals in are a
1-5/8" socket, or a coupling for 1-1/4" PVC pipe. Also
notice how the power steering reservoir is being held up out of
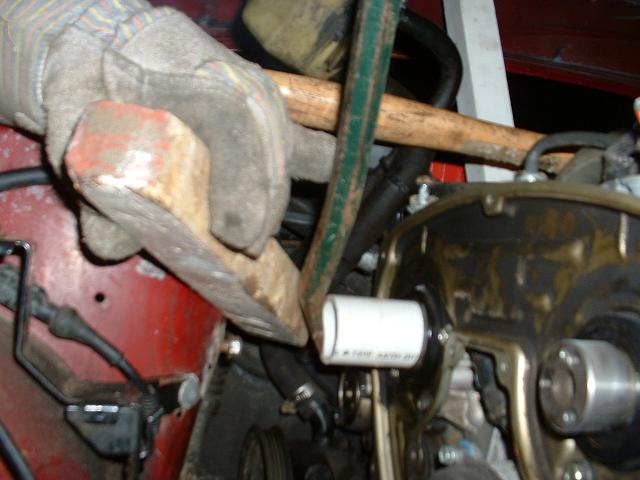
the way. Repeat this process for the two cam seals that sit
behind the cam sprockets. (With the one on the right, you may
find it easiest to tap on a block of wood against the PVC pipe
with a hammer.)
20. Now we will work on the third cam
seal,
which is behind the CID (camshaft position sensor). This is the
hardest one to work on, so go grab a bite to eat, go to the
bathroom, and prepare for frustration.
First let's remove the CID. Unplug the
connector, and then unbolt the CID. It is held on by two 8mm
bolts, one here and the other underneath.
Here we see the metal vane that interacts
with
the CID. It is held on by two phillips screws. Remove it, but
don't forget which way it goes on!
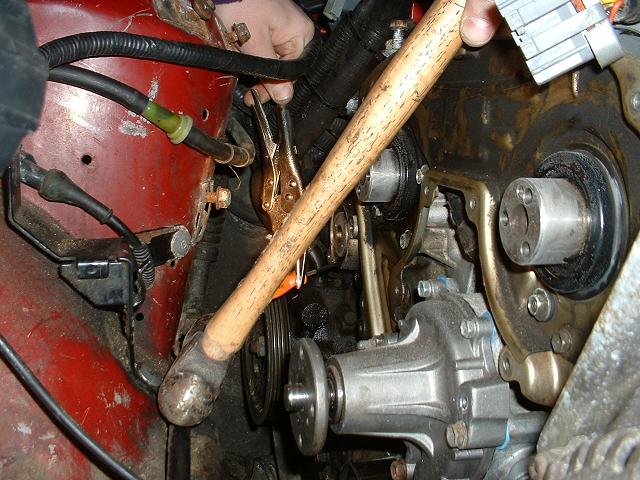
What's happening here? Again, we use a
sharp
punch to make a hole in the cam seal, but there isn't much room.
We attached a pair of vise grips to the punch, and now can hold
it without our hands being in the way. With no room to use a
hammer, we are using a prybar to force the punch into the seal.
Not easy or fun.
Once we have the hole started, we can
angle the
punch out more and use a hammer to get a good hole in there. Then
we can remove it the same way as the other ones with a pick tool.
It will require a LOT of force to pop it out. It may be helpful
to heat up the outside of the housing to get that seal out.
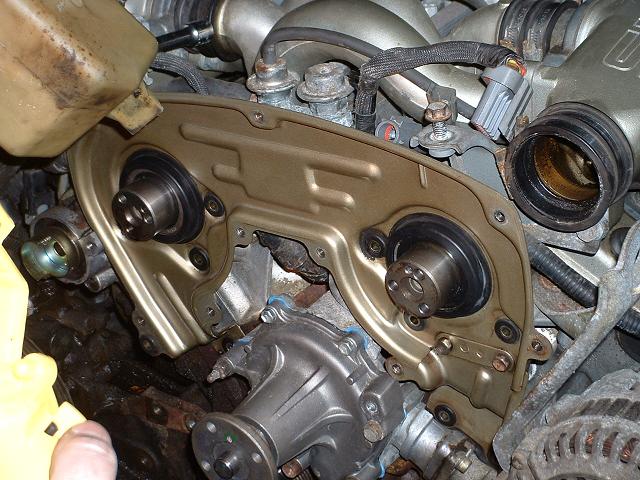
Now we'll replace that cam seal. This
also can
be difficult, but stay with it, we're almost done! Like the other
seals, grease it will and try to slide it over the cam, but this
time you have housing around the outside as well. Depending on
the ambient temperature that you're working in, you might have to
use a propane torch or similar device to warm up (and expand)
that outer housing. Once you get it started, use your PVC pipe to
press it in. Notice the angle that the prybar is coming from in
this pic. This seems like the best angle to get the seal in. Make
sure you press it in the whole way.
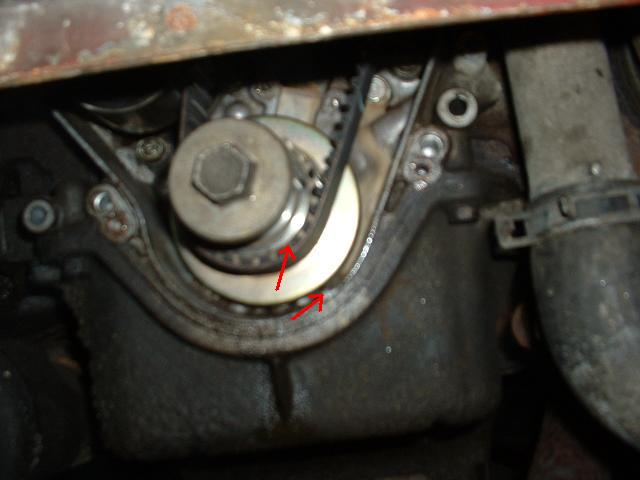
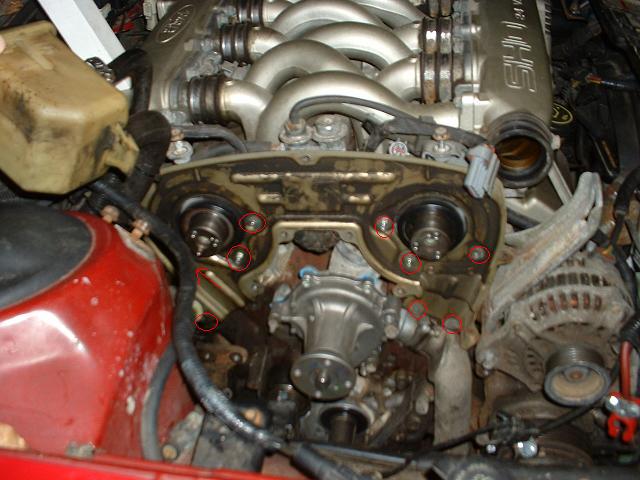
21. This is the best time to remove the
rear
timing belt cover and clean it up. Also when we remove the cover,
we can get a really good look at the seals and make sure they are
in all the way. There are nine 10mm bolts holding it on in these
locations. (The ninth bolt is just out of view where the arrow is
pointing.) They are all the same length.
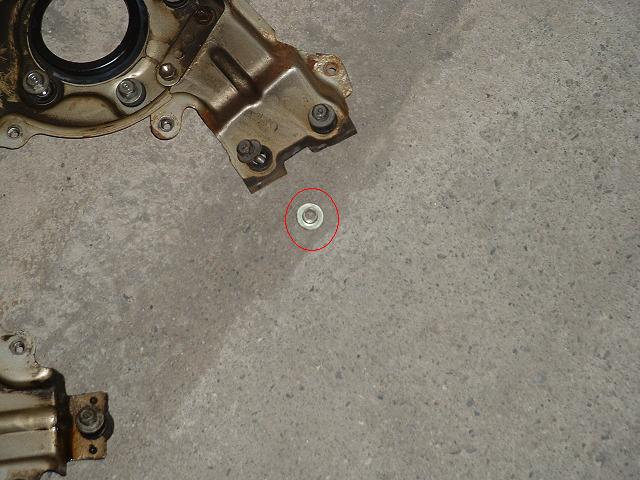
See this little metal piece? There's one
for
every bolt that goes through the rear cover, and they like to pop
out of the back of the cover. Don't lose any! :)
22. Reinstall the rear timing belt cover
after
it is cleaned up. (Carb cleaner works well.) The nine 10mm bolts
only need to be snugged, don't torque them too much! You can also
install the metal vane that attaches to the cam inside the CID.
(Two phillips screws)
Then the new CID (or old one if you
decide to
reuse it). There are two 8mm bolts. The rear bolt can be hard to
get to, you probably will want to use a small extension. Also
connect the CID to it's harness.
And then install the cam sprockets. There
are
three 10mm bolts on each sprocket. Just get them snug for now,
we'll tighten them more later, after we install the new timing
belt. Alternately, you can use a strap wrench to tighten them
now.
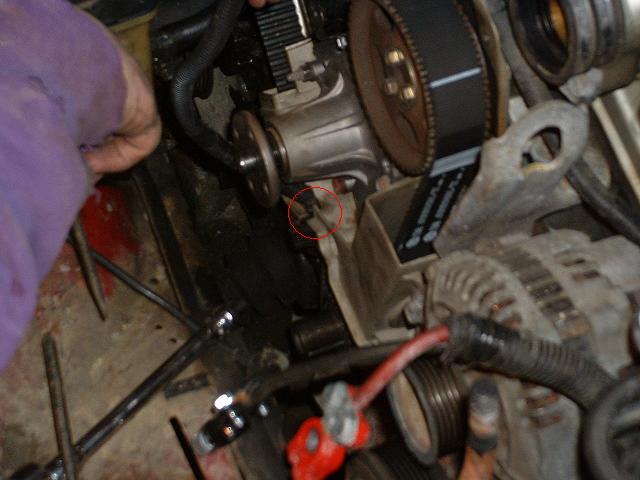
23. Let's move on to the waterpump. We
first
must drain the cooling system. Loosen the drain cock on the
bottom of the radiator and drain the coolant into a pan. You'll
have to take the radiator cap off to get it to drain. Once all
the coolant is drained, pull off the lower radiator hose where it
connects here.
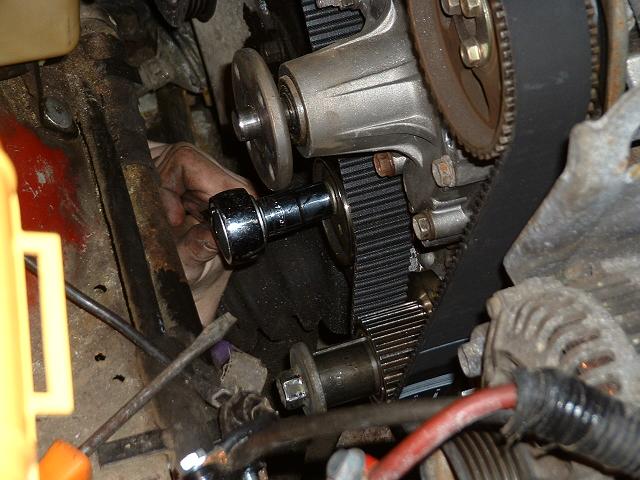
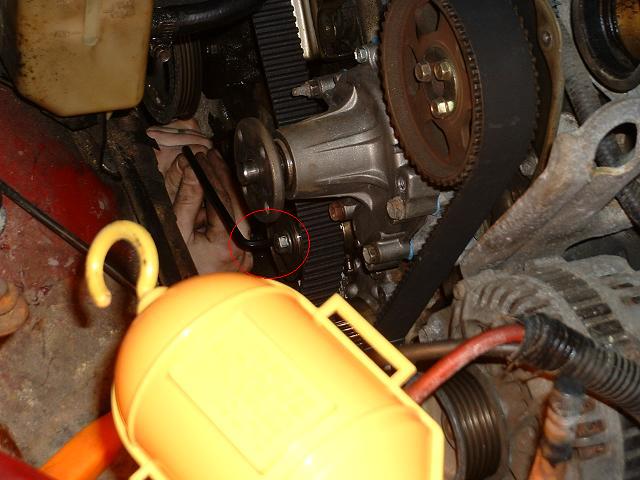
Then remove the four 12mm bolts holding
in the
waterpump. You don't need to touch the three 10mm bolts at this
point.
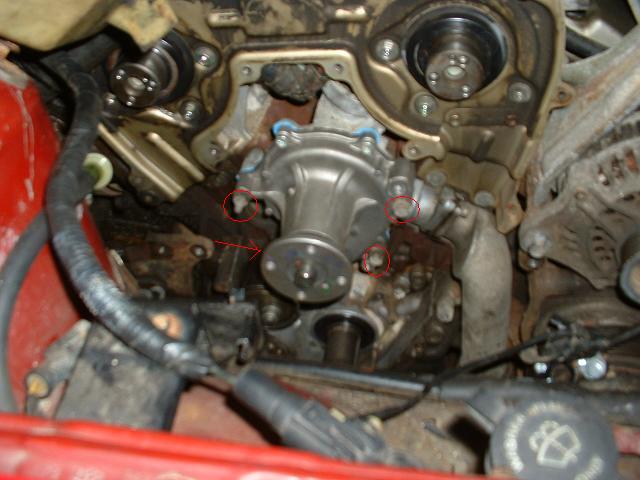
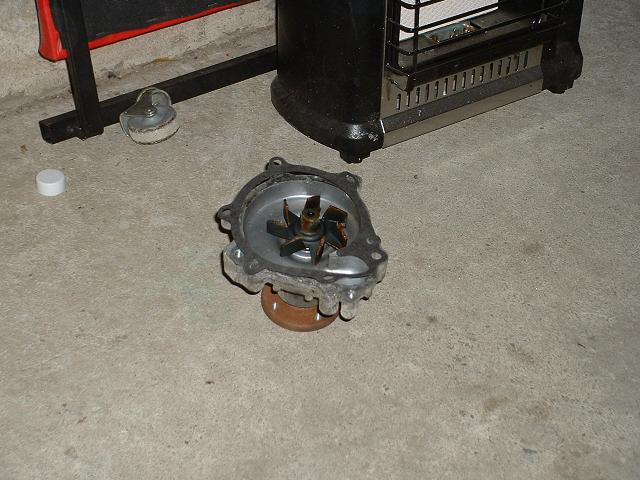
Once you remove the waterpump, seperate the pump from the housing by removing the three 10mm bolts.
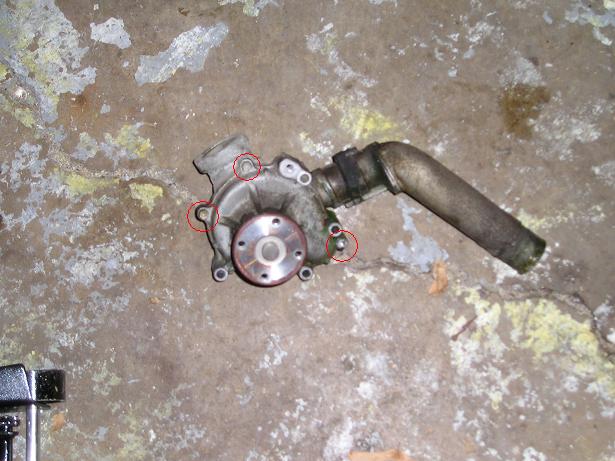
You can now separate the two pieces. (You
may
have to give it a little tap.) The part that you replace is in
the first picture. You want to take some gasket adhesive (black
RTV works fine) to hold this gasket onto the new pump. Then
attach the new pump to the housing, making sure that the gasket
goes on correctly.
The housing itself
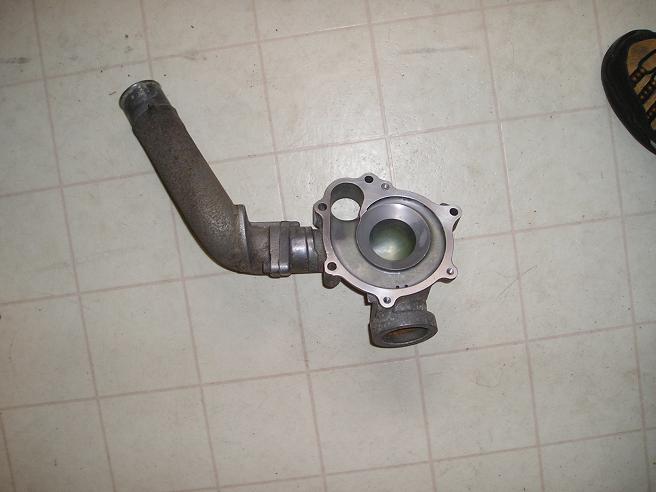
There are also three o-rings (two on the pump housing and one on the pipe in-between the engine heads, behind the housing) that should be replaced. Then install the entire waterpump with the four 12mm bolts, replace the lower radiator hose (a new is a good idea at this point), and fill the radiator with coolant. Once you start the vehicle you will have to keep an eye on the coolant level and make sure that the system is cooling properly. Follow the procedure in your repair manual on refilling the cooling system.
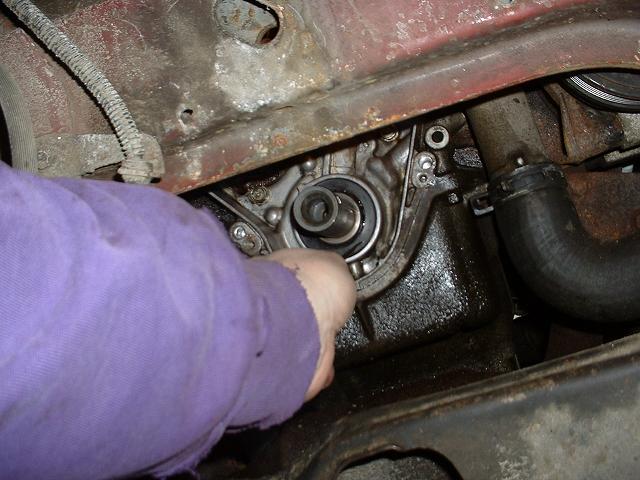
24. Replace the front main seal. This can
be
removed and replace the same way as the cam seals, but you will
probably find it a lot easier. You will need a fairly long piece
of 2" PVC pipe to press the new seal into place. In this pic
we are using a punch to put a hole in the seal, then we will use
a pick tool to remove it.
Now we're done taking things apart, it's
time
to get it all back together!
60k Parts List Page One Page
Two Page Three