 |
 |

Thanks to Gez89SHO for this write-up
I recently changed the clutch on my ’89. I did a similar job before on a simpler car and felt ready enough to attempt this. Now that it’s done, I decided to write up this procedure. While there is a lot of info here already- I did read a whole lot on the forum, and the Helms Manual before deciding on the job -I wanted to put everything in one easy to reference place. So here is the “How I did it”:
Disclaimer: Before you begin, please realize that this is a guide. Be careful while working – I am not responsible if you render your car inoperable, or for any injuries you or anyone helping you may receive. Read through this whole procedure and ensure you have the resources to complete it. This is a hard job, and while not impossible, not everyone can do it. There are parts that can fall down, break, fall on YOU, leak, strip, get lost, etc. Also, you will be working with hazardous materials-clutch dust contains asbestos, and the fumes from the cleaning agents won’t help also. Have it done professionally if you feel uncomfortable.
Stuff you need:
Time to finish – while some can do it in a day, it can take you a week if you never did it before. Take your time- parts/tools can break, you will be waiting for stuff to come in, and if you get frustrated/tired, it’s best to leave it for later.
Location- preferably find a garage to work in, with plenty of room to walk around the car and to allow for parts storage. Ensure it has adequate ventilation. You will take off the subframe and transaxle (and more) , so you’ll need a bit of floor space. You can work outside if it’s level and secure, but you really should be indoors. This will take a long time, and you don’t want to stop just because it’s raining.
You will need an assistant to help remove and reinstall the transaxle, subframe, and y pipe. Ensure you have another car to drive while this one is down.
Inventory control-whenever possible, put nuts/bolts back into where they were removed from. This cuts down clutter, and eliminates guessing “where does this bolt fit?”
Tools/items: besides common tools
(ratchet, deep sockets, etc) you will need:
-Engine support or hoist to
support engine from the top. A fender mounted support is preferred as this
leaves the underside clear for movement. You will be there a lot.
-Impact gun to remove flywheel. You can try to remove it manually but consider this: you cannot really put a wrench on there from the top, and to be pulling on the flywheel from the bottom, while you are laying under the engine, is not advisable.
-Torque wrench.
-Big Freakin’ Hammer and crowbar, to move
things in/out of place. And for therapy 
-Some penetrant and engine cleaning sprays. I used PB Blaster and Gunk Engine Brite.
-Loctite (Blue) for the flywheel and pressure plate bolts.
-If you got a new flywheel, a vise is needed to drive pins into the flywheel.
-At least 4 floor jacks (hydraulic and screw type), to support everything. 2 jackstands also.
-A transaxle jack will be helpful, but is not necessary.
-Block of wood to help support engine.
-Some rope or wire (to support items while hanging).
-Goggles, mask for eye and vapor protection.
-Small pump for filling trans fluid.
-Gloves and some clothes you don’t care about- you will get dirty. Repeatedly.
-If you are unlucky (like me), and break the y-pipe studs:
-Tap and die set, the studs are M10x1.50.
-Drill and drill bits, to drill out old studs.
-Compact cutting tool (a Dremel works well) to cut old studs off.
Let’s begin:
1. Apply penetrating fluid to the y-pipe studs and let it soak overnight (raise car as needed). Lower driver side window (only if indoors). Disconnect negative battery cable and set parking brake.
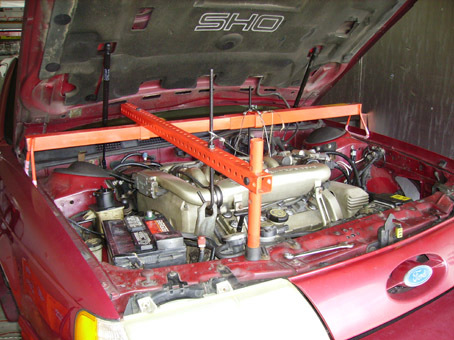
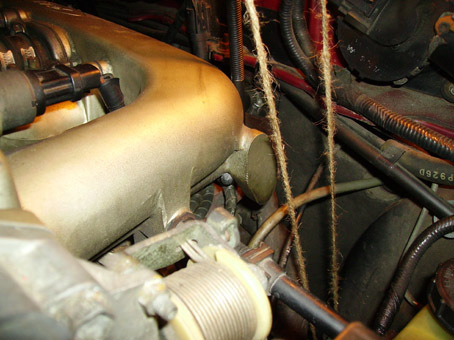
2. Support the engine and trans: setup engine support carefully- the engine will be hanging over your body. Assemble support as per instructions. Front goes to the hanger bracket, rear goes to the EGR bung at the rear of intake (I found this location to work for me). Add the safety cables if so equipped-wrap them around intake tubes. Tighten both ends and make sure it is steady. Refer to the 2 photos below:
3. Raise car slightly (tires still touching the ground),and remove center caps from front wheels. Loosen all lugnuts and the 29mm axle nuts.
4. Raise car fully and then support it securely on jackstands. Raise high enough to clear the trans. Remove the wheel and axle nuts, remove front wheels and set them behind the jackstands.
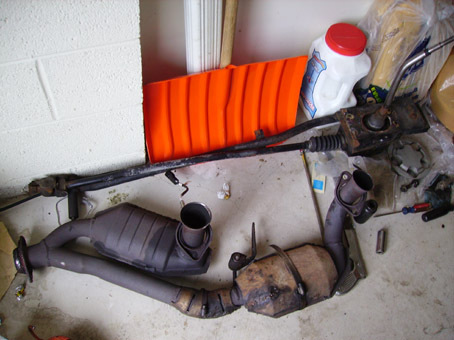
5. Remove y-pipe. Remove the rear spring bolts and then place jack under the rear cat. Carefully remove the y-pipe nuts from the front and rear manifolds. Also remove the two bolts from the y-to-oil pan mount. Once loose, lower it carefully, it’s a bit heavy.
6. Remove the control arm-to –knuckle bolts. Get a crowbar and make sure the control arms are loose from the knuckles. Don’t remove at this point- they will come down with the subframe.
7. Remove the sway bar links from the strut. There is a hex on the other side of the bolt so you may hold with a wrench while you’re loosening. Tilt them out of the way.
8. Remove shifter. Remove the shift knob, the rod shifter support and shifter clevis pin, then the 2 bolts at rear of shifter and set it aside. You may need to remove the other 4 bolts if the exhaust is in the way. For the cable setup, remove clevis pin, take off the bracket with cables, then remove the cable support bracket. Let it hang out of the way. Pic 3: The parts pile will grow…
10. Tie up the steering rack to support it while subframe is out. Make sure it is holding.
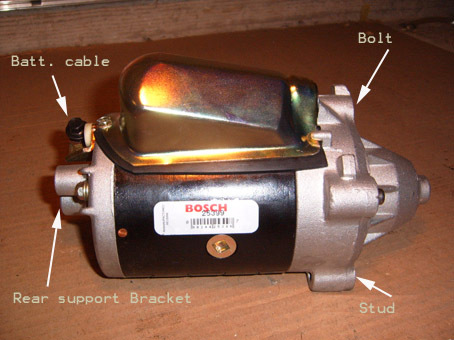
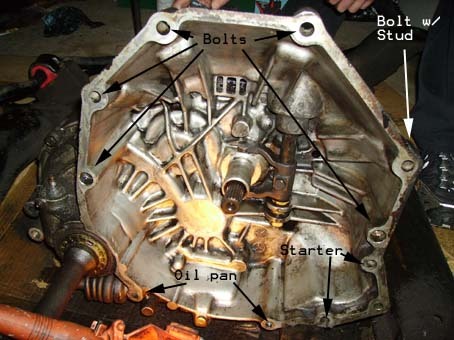
11. Remove the starter. Refer to photo below.
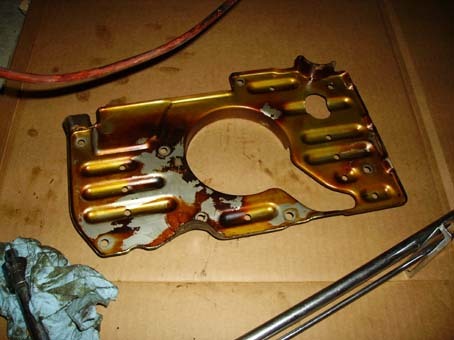
12. Remove the 2 oil pan-to transaxle bolts. Remove the plate if it doesn’t fall on its own.
13. Disconnect Engine mounts: Remove the front, rear and transaxle mount nuts/bolts. At the front of the subframe, remove screws that hold the steering fluid cooler from subframe and let it hang. Support engine under the oil pan. Use a screw jack and a block of wood.
14. Remove subframe. Be careful here- you do not want the engine to drop down! Place jacks at front and 2 rear corners. Loosen the 4 18mm subframe bolts. Slightly lower subframe (until there is a gap between the mounts and subframe) Slightly loosen the jack under the oilpan until you see a gap. You are looking for the engine to be suspended only by the top support- if it is not, and it just keeps moving down- raise subframe and oilpan jacks, and redo step 2. Once you are sure that the support is holding, remove the subframe bolts, lower subframe all the way (watch for any stuff you forgot to disconnect), then remove the jack under the oilpan. Drag subframe out of the way, preferably on cardboard or something similar. Put back the jack under the oilpan and support the engine. Pic 5:the subframe is out.

15. Remove CV joints from the hubs. Loosen the joints with a hammer, then pull/turn the hub to allow enough space to get the joints out. You may tie them temporarily so they don’t hang.
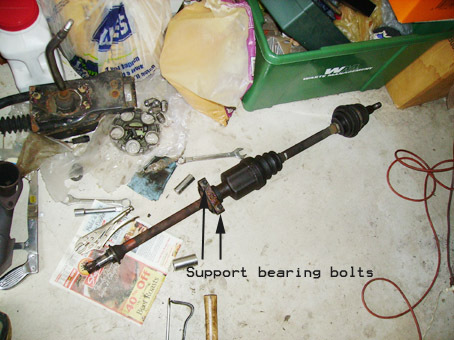
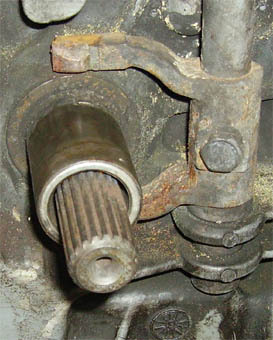
16. Remove the passenger side axle and link shaft as a unit. Place a pan under the trans to catch the fluid. You will need 2 people here. One needs to loosen the support bearing bolts (2) and the other holds and pulls the axle out. Keep holding it while the support bolts are out! There are no clips or anything holding the axle to the trans- it will (should) pull out easily. The driver side axle does not need to be removed. Pic 6: the axle and link shaft.
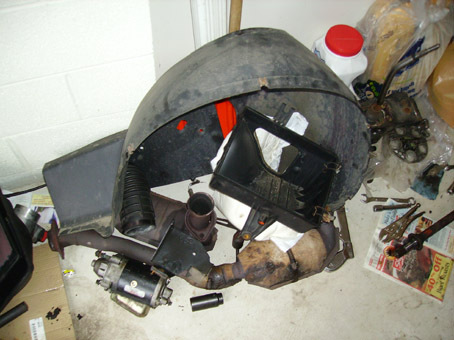
18. Remove the driver-side splash shield. Take off the clips, and the 3 fender screws plus one bolt at the rear wheel spat. Then wiggle it out. Pic7: the parts pile keeps growing…
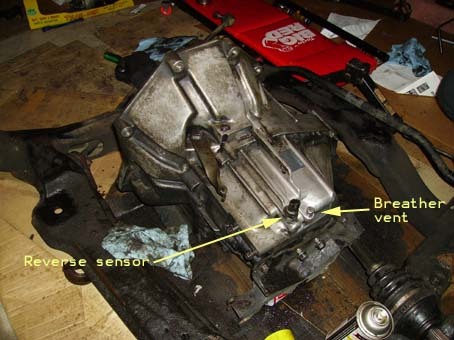
20. Unhook the reverse lamp switch from the top of the trans.
21. Loosen clutch cable. Have some one pull up on the clutch pedal and then pull the cable forward from the clutch fork. Gently release and let it hang out of the way.
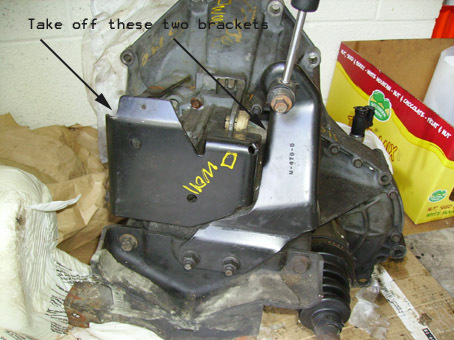
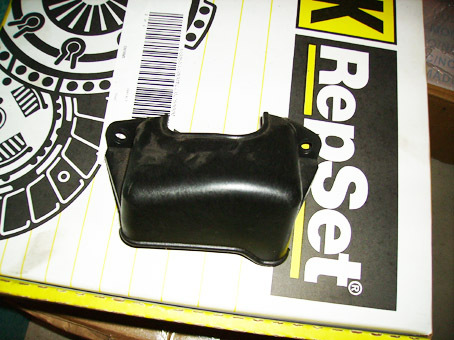
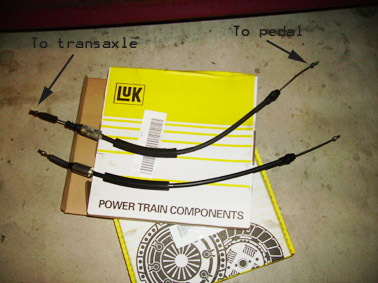
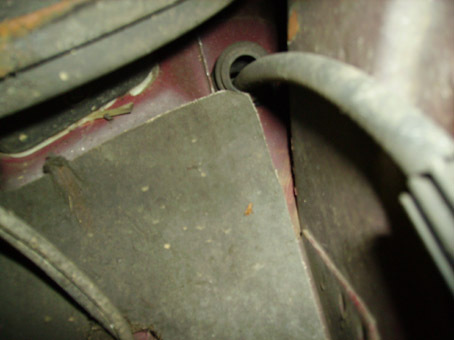
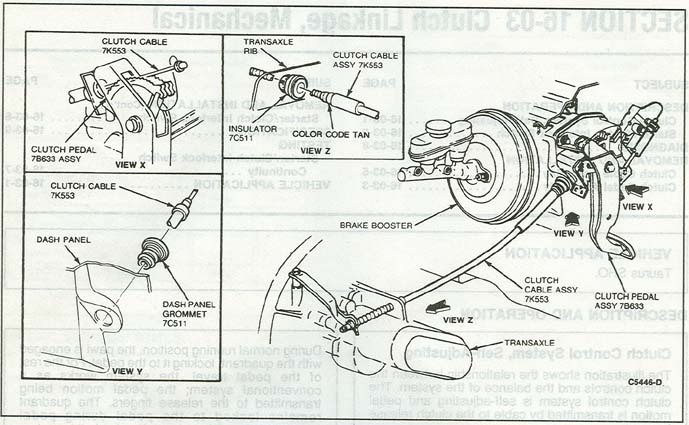
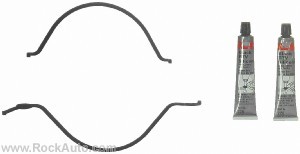
22. If changing clutch cable: Refer to the 4 pictures below.
Shield:
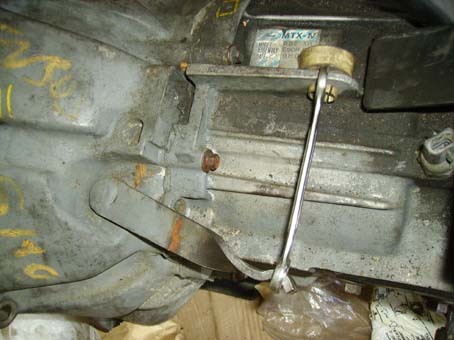
23. Loosen speedo cable by undoing the nut at the bottom (see picture). Let it hang out of the way.
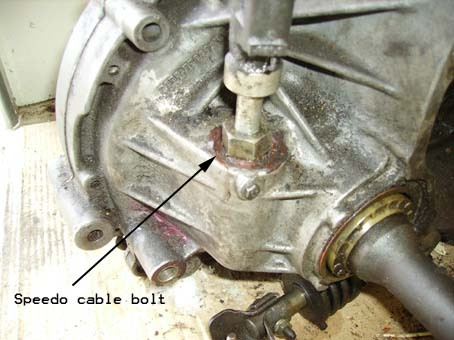
Bolt locations:
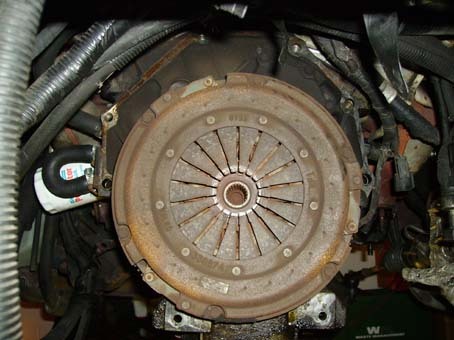
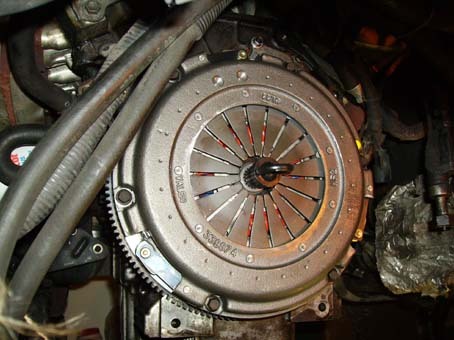
25. Remove clutch and pressure plate. Put the mask on and keep it on for the next few steps. Loosen the 6 10mm bolts in stages – a few turns for each one, as the p-plate is spring loaded. Once loose, lower the p-plate and clutch carefully, as it’s heavy. Try to create as little dust as possible. Pic 16 old clutch…nasty but it lasted 82k miles.
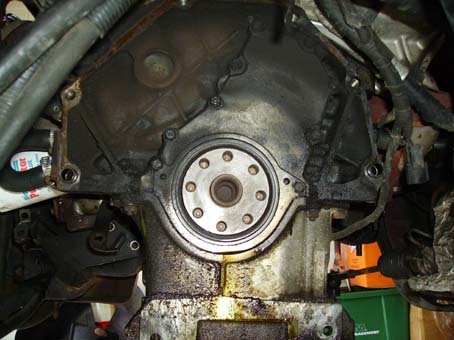
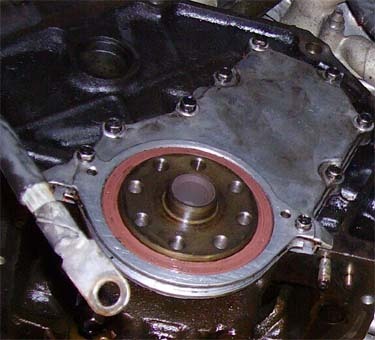
28. Remove the oil pan and carrier seal. See pics below.
Oil pan removed:
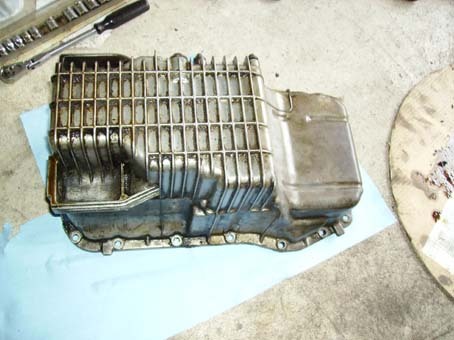
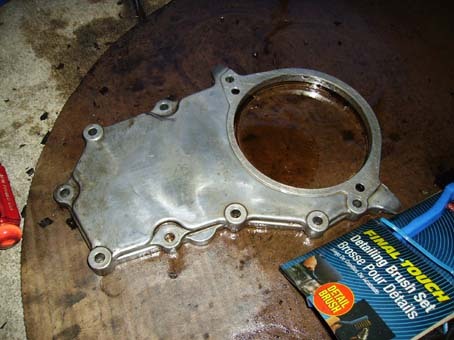
29. Clean the old gasket material from the oil pan and the carrier plate. Use razor for carrier seal if needed. Remove old main seal by tapping it out from the plate. Carefully clean the old gasket material from the engine mating surfaces.
30. Pic 22-25: Now is a good time to clean the carrier plate and oil pan if you wish
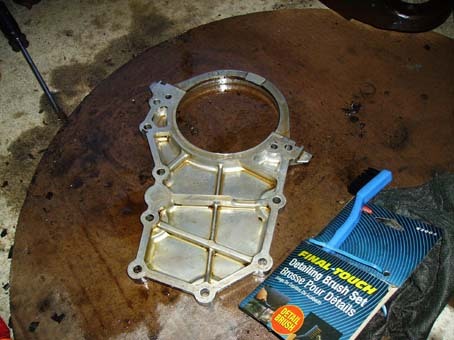


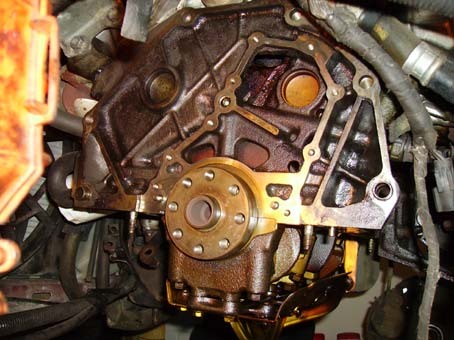
1. Seals: You may need to straighten out the carrier seal as it may have bent in shipment. Tap the new rear main in using the old seal-it should be flush or very close to flush- there is a stop at the end to stop it from going too far. Make sure it is even. Mount the carrier plate and rear main carefully, ensuring both seals seat properly. Oil pan- there are two gaskets at the ends and there is rtv gasket maker on the sides. Spread the rtv and then install the oil pan. Work quickly- the rtv will only take about 5 minutes to start setting!
Pic 26-28:
Rear main seal and carrier gasket. Pics are from RockAuto, I got their Felpro seals:
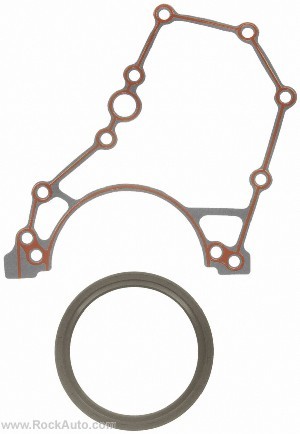
Rear main as installed:
2. Do not touch or otherwise contaminate the clutch, flywheel and pressure plate friction surfaces. Handle by edges and center only. Ensure they are clean and dry upon install.
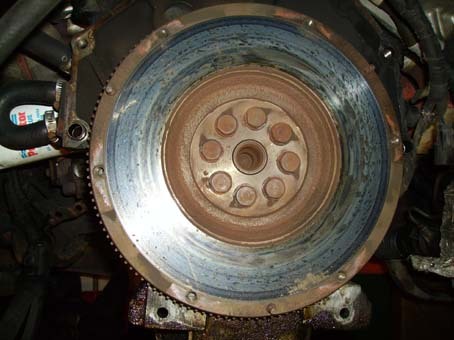
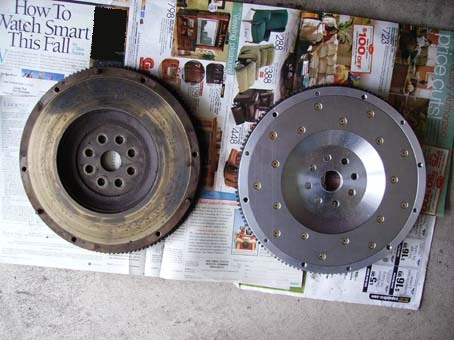
3. Flywheel:Old one needs to be professionally resurfaced. If you are putting on a new flywheel, it just has to be prepped. (pins put in) Refer to photos below:
Old fw 20 pounds, the fidanza is 10 (I did weigh them). Note pin holes and the pins on old fw:
Flywheel installed, note the bolt out of line and the pins (studs):
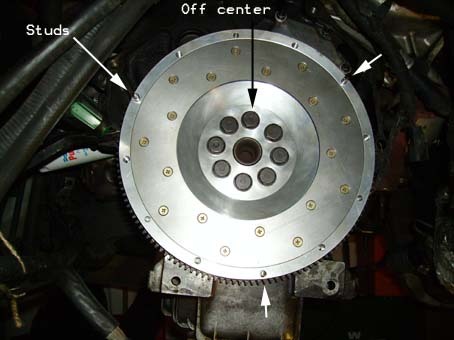
I choose to use a Fidanza flywheel instead of reusing the old one. There are 3 pins that fit into the outer holes (for the revised, larger clutch. Inner holes are for the original clutch). Compare to old flywheel for reference. Make sure you fit them to the right holes- you won’t be able to get them out afterward! Use the provided loctite, then use a vise to drive them in. Once done, get your pressure plate- the pins have to fit deep enough to make the p-plate fit flush. Personally, I couldn’t fit them all the way, and I had to grind them down until it did. Make sure you can fit the p-plate flush against the flywheel (i.e., no gap at all). When done, set the p-plate aside and bolt the flywheel on, using a bit of blue loctite on the bolts. Note: the bolt holes aren’t even, one bolt is slightly “off”. See the picture. Get them aligned and then thread them in. Tighten in an alternating pattern.
4. Install the clutch, refer to photos 31,32 below:
Clutch installed:
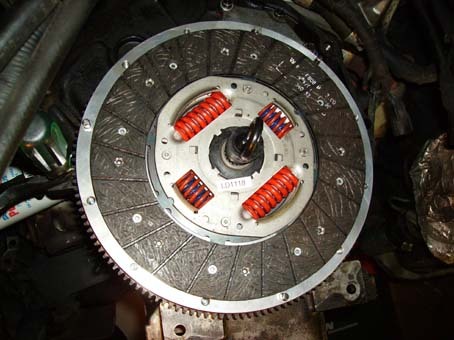
Pressure plate installed:
This is a stock piece BTW, says LUK on the box but there are Valeo markings on p-plate and clutch.
Place clutch on the flywheel using alignment tool. Make sure the right side faces the engine-it is labeled.
Now put on the pressure plate, tightening the bolts in a alternating pattern so as not to damage the p-plate spring. Ensure the Alignment tool is at the center as you are tightening. Once done, remove alignment tool.
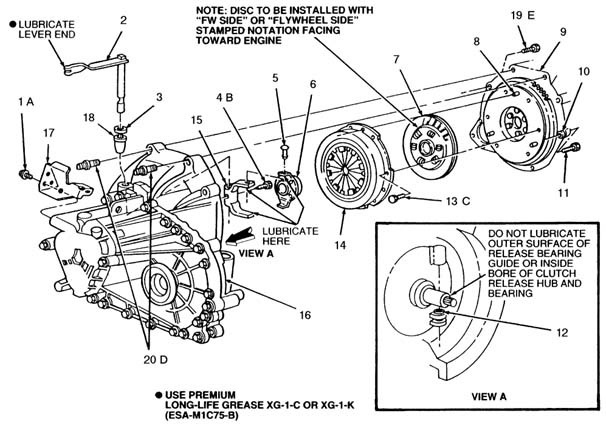
5. Transaxle prep: See the pics 14,33-35 below:
Nice clean bellhousing. Note no sleeve is installed. I had the old TOB:
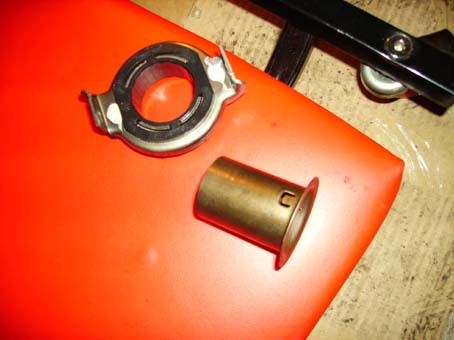
TOB and sleeve:
Wrench to keep clutch fork in place during install:
Sleeve installed, note how it fits flush. This is my spare trans, I took a few pics afterward:
Note where the fill plug is at the front of the case. Put your mask on (asbestos again). Clean bellhousing thoroughly and install new TOB. If there is no sleeve present, drive the supplied steel sleeve using the 29mm axle socket. If there is a sleeve, and it is in good shape, leave it there. Do not lube the TOB inner bore or the steel sleeve – leave dry. Install the plastic pin supplied. Lube the input shaft using the supplied lube. Place a wrench or similar item in the release fork to keep it from moving as you’re mounting the transaxle. This avoids the TOB getting out of place.
6. Transaxle install- take a break, this will be frustrating. See pic below.
Exploded drawing of assembly:
You will need to set it on jacks just like before- one at the mount, two at either end of the seam. There is not a lot of room to maneuver and the alignment needs to be pretty much perfect for the input shaft to fit the clutch. Watch the wires above. Do not tighten the bolts until the input shaft is in. You will need to spin the axle to fit the input shaft. Once it no longer spins, you will know it’s in. Push it fully on and tighten. Remove the wrench from the top.
7. When installing subframe, look for the alignment holes directly behind the 2 front bolts:
They line up with holes in the body, insert a bar through to align the subframe to body. Also, ensure you install the steering rack and control arms correctly. The helms recommends you install new subframe, control arm and CV axle bolts/nuts.
8. Add engine oil and trans fluid. Trans filler is at the front of the case, and accepts a ¾ drive. It takes 1 and ½ qts. ATF- I used Dextron3 available at Sears. Place pan under trans first to catch the overflow.
9. Once all together, check shifter and pull up on the clutch pedal to adjust. Press down to ensure it works. Once satisfied that the clutch and shifter work fine, get ready to start. Disconnect the fuel pump by tripping the fuel pump circuit breaker: it is in the trunk on the left side. Just bump it until you see the button pop up.
Start a couple of times to get oil circulating. Then reset the breaker and start engine. Go and enjoy your test drive!
Torque settings, from Helms unless indicated:
- Rear main seal Carrier: 55-82 lb-inches –NOT lb-ft.
- Oil pan bolts/nuts: 11-17 lb-ft
- Flywheel: first 37 then 58 lb-ft. Value is from forum.
- Clutch pressure plate: 12-24 lb-ft.
- Transaxle to engine:30-40 lb-ft
- Transaxle to oil pan:11-17 lb-ft
- Subframe Bolts: 65-86 lb-ft
- Steering rack: 85-105 lb-ft
- Engine and transaxle mounts:50-75 lb-ft
- Shifter stabilizer bolt:35-45 lb-ft
- Y pipe to manifolds:26-34 lb-ft
- Y pipe to resonator: 21-29 lb-ft
- Control arm to knuckle:40-55 lb-ft
- Axle nuts:80-105 lb-ft
- Wheel nuts : 85 lb-ft
That's all. Big thanks go to Matt Bopp for helping me, and Terri Huffnagle for the bit of expertise needed.
One last note- this was done on an 89, using a Helms for an 89. If you have one too, and there are inconsistencies, follow what it says in yours. Also , it's a good idea to re-check torque on the bolts (the ones you can get to anyway) about a week later.
Now enjoy the car!
Please don't forget:
Maintaining this website is not free.
Please, if you have been helped by these guides,
make a small donation through paypal.
It only takes a minute! Thank you.
