|
MTX-IV
Disassembly Procedure
Brief
instructions on how to disassemble your
MTX transmission.
Updated
02-08-06 ~ Bizzy
|
While the MTX trans isn't
that
complicated, it is a rather
complicated task (for me) to tell someone how to disassemble it. I could show you in 5
minutes. But also
keep in mind that there is an order in
doing things and there is a reason for the order.
Below you will find
illustrations on the disassembly process, however
the responsibility, liability and risk is upon you if you decide to
take your trans apart. In
other words, I assume no responsibility if you
screw something up, lose a part or otherwise can't get the trans put
back together or if
something goes wrong with the trans after you get it put back
together. I also have
not gone into great detail on these instructions, there are not (not
yet anyway)
instructions on how to clean the internals and perform the re-assemble,
so you do this at
your own risk. I will try to finish the whole write-up ASAP,
but it will take time.
If you run into a boggle, feel free to email me
if need be.
Having said that,
here’s some illustrations for you to go by.
|
|
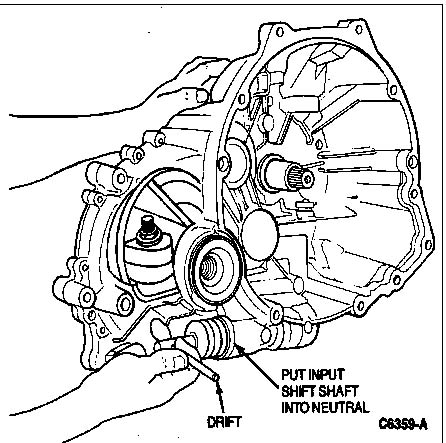
The first thing to
do is
to sit
the trans as positioned in the picture below.
Insert
a drift punch into the hole in the shift shaft and place the trans into
neutral if it
isn’t already and move the trans into the neutral position. This is an important step
in order to make it
easier for the removal of some of the internal parts.
Failure to do so and you risk
damaging the synchros!!
|
|
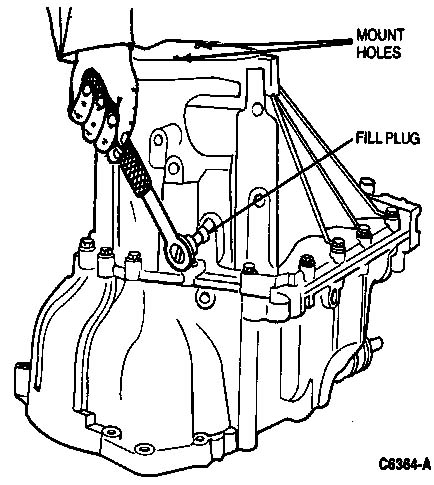
Second thing to do
is
place the
trans on a bench with the bell housing side down.
Prior
to that you can remove the shift fork assembly or not.
To gain access to the internals it is
not an
absolute necessity however with the
fork in place you’ll have to move it out of the way when
removing a couple of the
case bolts. It IS
a good idea to
remove it so you can at least clean the assembly and check your
bushings to make sure they
are good. They're cheap enough and it would be a good idea
to replace them.
You can also remove the backup lamp switch as well. Again,
you don't have
to in order to open the trans up.
Remove
the fill plug by inserting the square end of a 3/8 ratchet into the
plug and loosening as
you would any bolt. Rightsy-tightsy,
leftsy-loosey.
|
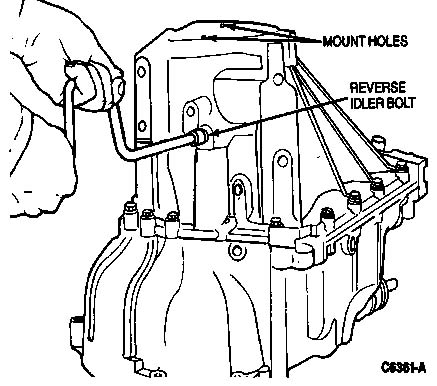
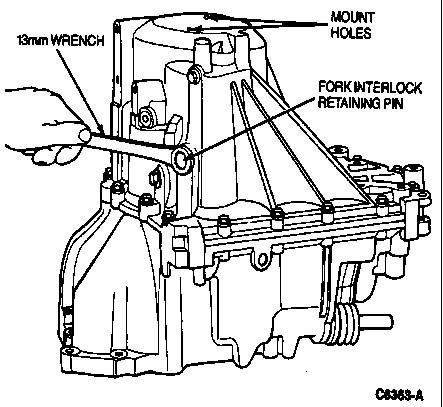
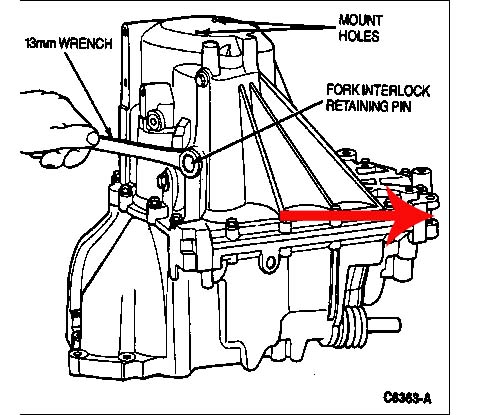
| Remove
the reverse idler retaining bolt and the fork
interlock retaining bolts. LOOSEN (ONLY LOOSEN)
the detent plunger
retaining bolt. It's a good idea to keep a plastic
bag handy to keep all the
bolts together so they don't get lost or misplaced. Do
NOT
completely remove the detent plunger retaining bolt. (Or
do.....but you'll be
soooooorrrry.)
Remove
Remove
Loosen
only

|
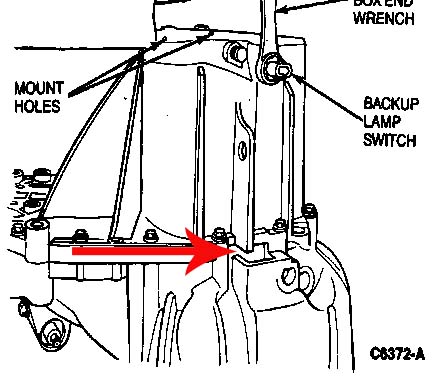
| Now
remove the 15 (sometimes 16) case bolts. Pay
attention if yours only has 15, you'll want to replace them into the
same holes.

|
| Now
it's time to separate the case halves. There
are two spots on the case that can be used for prying, I use the same
tire iron (AKA
"Tranny Tool") to pry the case halves apart. Under NO
circumstances should you insert the tool between the mating surfaces of
the case
halves. Those surfaces must stay true in order to seal
properly. If you
scratch or gouge those surfaces your tranny will leak, so take care
during the separation
process, use only the pry spots in the pics below. NEVER
set a case
half on the ground on those surfaces.
Illustrated below are the areas that are
safe to
pry the case halves apart.
|
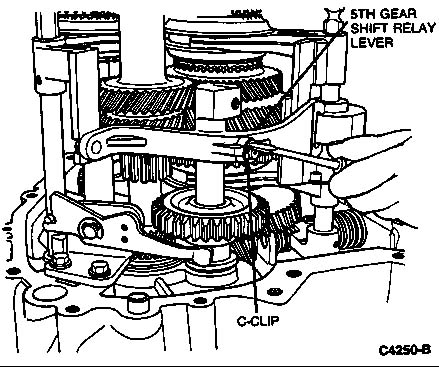
| Locate
the reverse idler gear assembly. Take a
small flat tipped screwdriver and remove the C-clip and set it
aside. Remove the arm
from the assembly. Take the center shaft in one hand and the
gear in the
other. Lift up on the center shaft, once it clears the case
you can remove both the
gear and the shaft. Generally I will reassemble the shaft,
arm and C-clip just to
keep the parts together, the C-clip is easy to lose and that's not a
good thing.
|
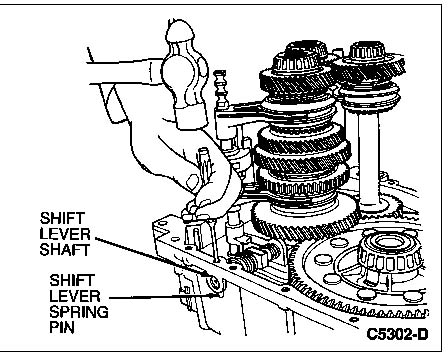
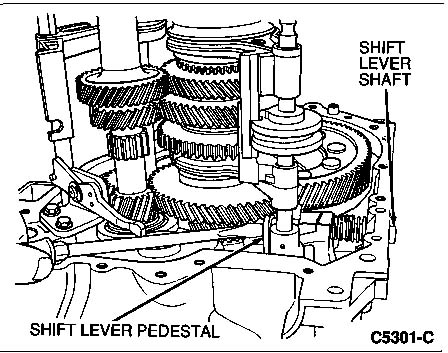
| Next
you need to remove the spring pin that holds the
shift lever spring assembly. Use a drift punch to drive the
pin from the case.
MAKE SURE THE DRIFT PUNCH IS NOT TOO
SMALL!!!!
You do NOT
want to get a punch stuck in the middle of the spring pin, trust me.
|
| Remove
the shift shaft lever assembly. I usually
use an every day tire iron to nudge the center shaft outward a little
bit. Once the
shaft is out of the case enough you can catch the hole in the shaft
with a drift punch or
small screw driver. From there you can manually remove the
shaft. Once the
shaft comes out enough you can catch the 2 springs. Depending
on the mood of the
person who assembled your transmission (or Ford's stock), you may or
may not have 2
springs. It seemed luck of the draw on whether the reverse
kickback spring was
installed or not. There will be at least 1 large spring on
this shaft
however.
*Important note: When removing the
shaft
it is a good idea to put
your finger over the hole in the shift lever assembly.
Sometimes when the shaft is
removed the detent spring will shoot the ball bearing out of the
hole. It doesn't
come out with a lot of force, but you don't want to lose the ball
bearing. Rarely
have I seen this, but it has happened.
Once the shaft assembly is out, remove the
lever
assembly. At this point it's
just sitting there with nothing holding it in place.
|
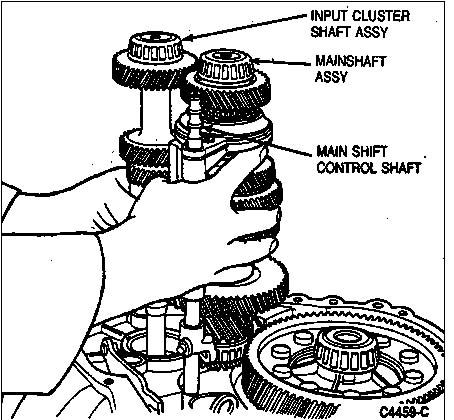
| Now
it's time to remove the main gear shaft assembly,
shift fork and input shaft. Take great care when removing
these parts, they are
heavy and if mis-handled you run the risk of popping a synchro
apart. (Don't drop
them!) With your left hand grasp the shift fork firmly, with
your right grasp the
assembly firmly and as evenly as possible across the entire
assembly. It's a good
idea to put your fingers on the gears rather than the synchro since
they can and will pop
apart. Lift on both the fork and gear assembly and input
shaft to remove them all
at the same time. They're heavy so take care when doing
so. When lifting the
gear shafts, lift straight up until the fork and gear assemblies clear
the case and the
funnel in the case that's under the race for the bearing. The
funnel is made of
plastic and can be damaged if mishandled. Set the gears and
fork aside.
|
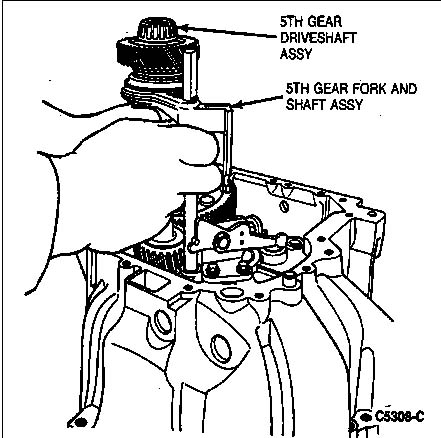
| Remove
the 5th gear shaft assembly and fork. They
lift right out and are easily removed. There is another
plastic funnel under the 5th
gear shaft assembly as well.
|
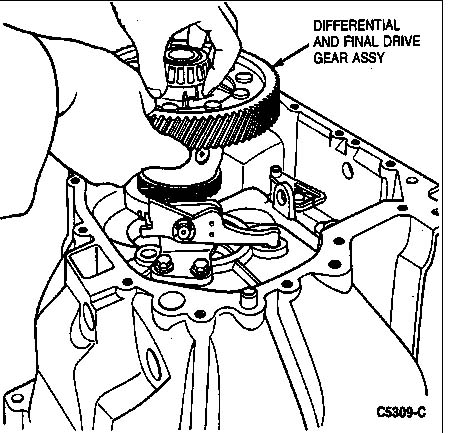
| At
this point you can remove the differential assembly
from the case, it just lifts right up. It's heavy so take
care to not drop it.
|
| Now
is a good time to check the bearings and bearing
races, replace your axle seals, input shaft and shift shaft
seals. Remember that if
nothing else, you should at least replace your input shaft seal since
it is the only one
that can't be done from the outside. Now would also a good
time to install a drain
plug as well. I never did enjoy doing those while the trans
is installed on the
car, MUCH easier with it on a table. The drain plug
instructions can be found on
shotimes.com.
Assembly is pretty much in reverse order,
however
there are a few tricks
of the trade that help to make things easier. I'll try to get
a write up on that on
another day.
|
|
Oh......and one more
thing.
When you seal the case back up NEVER,
NEVER, NEVER,
NEVER
use RTV.......it'll come back to haunt you.
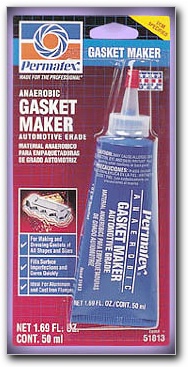
Use
Permatex Anaerobic sealant ONLY!
(Blue
tube, red sealant.)
|
Good
luck!
|